
Run Maestro tests
Step 1: Prepare an App
You can build your Application .apk file using IDE or in the CLI.
After that, the appropriate file can be found in build/outputs/apk/<profile> directory.
Additional information can be found here.
Step 2: Organize Maestro tests before execution
For uploading your Maestro testing suite, you need to compress your tests into a single .zip archive.
To prevent processing failures, do not use an OS’s graphical interface (such as macOS Finder’s “Compress” option) to create the archive.
This GUI method generates system-specific folders (such as _MACOSX and hidden files) which are incompatible with our system.
The best way is to create an archive using the built-in zip command on macOS or PowerShell/Command Prompt on Windows:
Example of a project with Maestro tests: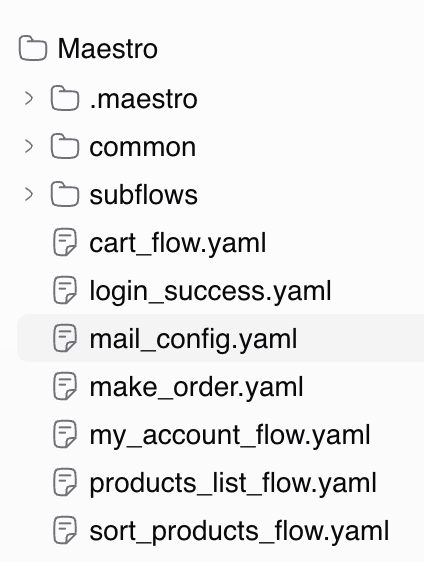
Example of commands to create an archive:
MacOS/Linux:
zip -r maestro_tests.zip path/to/directoryWindows:
tar.exe -a -c -f "maesto_tests.zip" "path\to\directory"Step 3: Upload the App and the archive with tests
Upload your Application and Test Suites apps to Mobitru using our REST API and the generated Access key.
Retrieve and store the id of every uploaded file, because it will be used to trigger an Execution.
Here is an example cURL request to upload the app:
curl --location --request POST 'https://app.mobitru.com/billing/unit/<BILLING_UNIT>/automation/api/v1/spaces/artifacts' \
--header 'x-File-Name: <app_name>.apk' \
--header 'X-Content-Type: application/zip' \
--header 'Authorization: Bearer <ACCESS_KEY>' \
--form 'alias="apk_debug"' \
--form 'file=@"/path/to/app/file/app.apk"' \
--form 'checksum="None"'
Below you can find a sample of the response with an id of the uploaded app:
{
    "id": "d32173ea-ceaf-457b-9fdc-ef7882c0d1ca",
    "name": "6f6a9dbf-5a88-4e22-8c9a-70930e94428f.apk",
    "realName": "<app_name>.apk",
    "bid": "7a21f4ad-e322-43e2-9649-0209de6a9752",
    "wid": "0",
    "private": true,
    "uploadedBy": "<user_name>@test.com",
    "uploadedAt": 1672165595,
    "verified": false,
    "target": "android",
    "contentType": "application/zip",
    "contentLength": 0,
    "href": "quarantine/6f6a9dbf-5a88-4e22-8c9a-70930e94428f.apk",
    "checksum": "None",
    "alias": "<app_name>",
    "apk": null,
    "ipa": null
}
Here is an example cURL request to upload the archive with tests:
curl --location --request POST 'https://app.mobitru.com/billing/unit/<BILLING_UNIT>/automation/api/v1/spaces/artifacts' \
--header 'x-File-Name: <archive_file_name>.zip' \
--header 'X-Content-Type: application/zip' \
--header 'X-Target: maestro' \
--header 'Authorization: Bearer <ACCESS_KEY>' \
--form 'alias="maestro_tests"' \
--form 'file=@"/path/to/archive/file/<archive_file_name>.zip"' \
--form 'checksum="None"'
Below you can find a sample of the response with an id of the uploaded archive:
{
    "id": "420bb311-289b-4745-835a-e9276f17766a",
    "name": "eb3cd115-9a0d-40e0-bed9-7ece5fac6c8c.zip",
    "realName": "<archive_file_name>.zip",
    "bid": "916f0549-4ddc-491a-9fe7-3f27597fd3b7",
    "wid": "0",
    "private": true,
    "uploadedBy": "dfc2813e-d04a-4750-8e61-b8ceaafd8066",
    "uploadedByName": "",
    "uploadedAt": 1782749904,
    "downloadedAt": 1782749904,
    "verified": false,
    "target": "maestro",
    "contentType": "application/zip",
    "contentLength": 9162,
    "href": "quarantine/eb3cd115-9a0d-40e0-bed9-7ece5fac6c8c.zip",
    "bucket": "quarantine",
    "checksum": "None",
    "alias": "maestro_tests",
    "apk": null,
    "ipa": null,
    "attributes": {}
}
Step 4: Find and take device
Find and take appropriate device using our APIs.
Here is an example of cURL request to find a device via API :
curl --location --request GET 'https://app.mobitru.com/billing/unit/<BILLING_UNIT>/automation/api/device/android?model=Pixel 6' \
--header 'Authorization: Bearer <ACCESS_KEY>'
Below you can find a sample of the response with capabilities for found devices:
[
    {
        "desiredCapabilities": {
            "platformName": "Android",
            "platformVersion": "12",
            "deviceName": "GOOGLE Pixel 6a",
            "udid": "26281JEGR04493"
        }
    },
    {
        "desiredCapabilities": {
            "platformName": "Android",
            "platformVersion": "12",
            "deviceName": "GOOGLE Pixel 6",
            "udid": "19161FDF600DJP"
        }
    },
    {
        "desiredCapabilities": {
            "platformName": "Android",
            "platformVersion": "13",
            "deviceName": "GOOGLE Pixel 6 Pro",
            "udid": "1A281FDEE007T3"
        }
    }
]
Here is an example of cURL request to take a device via API:
curl --location --request POST 'https://app.mobitru.com/billing/unit/<BILLING_UNIT>/automation/api/device/26281JEGR04493' \
--header 'Authorization: Bearer <ACCESS_KEY>'
Below you can find a sample of the response with capabilities for the device:
{
    "desiredCapabilities": {
        "platformName": "Android",
        "platformVersion": "12",
        "deviceName": "GOOGLE Pixel 6a",
        "udid": "26281JEGR04493"
    }
}
Step 5: Run tests
After taking a Device (in case of a single shard), you can run your Maestro tests using all existing information.
Here is an example of cURL request to run all tests:
curl --location 'https://app.mobitru.com/billing/unit/<BILLING_UNIT>/automation/api/v1/tests/maestro' \
--header 'Content-Type: application/json' \
--header 'Authorization: Bearer <ACCESS_KEY>' \
--data-raw '{
    "device_spec": {
        "serial": "0A071FDD4005QL",
        "platform": "android"
    },
    "app_artifact_id": "<app_artifact_id>",
    "test_artifact_id": "<archive_with_tests_artifact_id>",
    "report": "html"
}'
Below you can find a sample of the response with the Run ID:
{
    "id": "5377e329-b153-4604-a801-70f43f3ce244",
    "engine": "maestro",
    "status": "pending",
    "config": {
        "device_spec": {
            "serial": "0A071FDD4005QL",
            "platform": "android"
        },
        "app_artifact_id": "<app_artifact_id>",
        "test_artifact_id": "<archive_with_tests_artifact_id>",
        "duration": 60,
        "report": "html"
    },
    "summary": "",
    "artifacts": {},
    "created_at": "2026-06-30T15:30:10.800951Z",
    "updated_at": "2026-06-30T15:30:10.800951Z"
}
If necessary, you can cancel pending execution by performing the separate API:
Here is an example of cURL request to cancel the Execution:
curl --location --request PUT 'https://app.mobitru.com/billing/unit/<BILLING_UNIT>/automation/api/v1/tests/maestro/<RUN_ID>/cancel' \
--header 'Authorization: Bearer <ACCESS_KEY>'
As result, you will receive 204 No Content response.
Filter test cases
By default, all tests from the archive will be executed, but it’s possible to use multiple options to filter test cases for execution:
| Parameter | Description | Values |
|---|---|---|
| execute | list of paths to flow values to execute | ["path/to/subdirectory/flow1.yaml", |
| include_tags | list of test tags to include in the execution | [“include_tag1”, “include_tag2”] |
| exclude_tags | list of test tags to exclude from the execution | [“exclude_tag1”, “exclude_tag2”] |
| config | path to a config file with full execution configuration (tags, path to flows, etc.) | “config/app.yaml” |
More details for tags and the config file preparation can be found here.
Here is an example of cURL request for different cases:
curl --location 'https://app.mobitru.com/billing/unit/<BILLING_UNIT>/automation/api/v1/tests/maestro' \
--header 'Content-Type: application/json' \
--header 'Authorization: Bearer <ACCESS_KEY>' \
--data-raw '{
    "device_spec": {
        "serial": "0A071FDD4005QL",
        "platform": "android"
    },
    "app_artifact_id": "<app_artifact_id>",
    "test_artifact_id": "<archive_with_tests_artifact_id>",
    "execute": [
        "cart_flow.yaml",
        "products_list_flow.yaml"
    ],
    "include_tags": [
        "smoke"
    ],
    "exclude_tags": [
        "auth",
        "stagingOnly"
    ]
    "report": "html"
}'
Specify environment properties
By default, no environment properties are used in an execution configuration, but you can provide custom parameters by adding a field (env_vars) to the API request body.
The Field format is “<key>”:”<value>”.
Here is an example of cURL request with custom argument:
curl --location 'https://app.mobitru.com/billing/unit/<BILLING_UNIT>/automation/api/v1/tests/maestro' \
--header 'Content-Type: application/json' \
--header 'Authorization: Bearer <ACCESS_KEY>' \
--data-raw '{
    "device_spec": {
        "serial": "0A071FDD4005QL",
        "platform": "android"
    },
    "app_artifact_id": "<app_artifact_id>",
    "test_artifact_id": "<archive_with_tests_artifact_id>",

    "env_vars": {
        "SUCCESS_USER": "testuser@mobitru.com",
        "SUCCESS_PASS": "password1",
        "DEBUG": "true"
    },

    "report": "html"
}'
More details on using environment variables in tests can be found here.
Step 6: Get the Run details
After the Execution finishes, you can get the Run details via the API.
Here is an example of cURL a request to get such details:
curl --location --request GET 'https://app.mobitru.com/billing/unit/<BILLING_UNIT>/automation/api/v1/tests/maestro/<RUN_ID>' \
--header 'Authorization: Bearer <ACCESS_KEY>'
Below you can find a sample of the response with artifacts.log ID:
{
    "id": "<RUN_ID>",
    "engine": "maestro",
    "status": "completed",
    "config": {
        "device_spec": {
            "serial": "24131FDEE006R6",
            "platform": "android"
        },
        "app_artifact_id": "<app_artifact_id>",
        "test_artifact_id": "<archive_with_tests_artifact_id>",
        "duration": 60,
        "execute": [
            "cart_flow.yaml",
            "products_list_flow.yaml"
        ],
        "include_tags": [
            "smoke"
        ],
        "exclude_tags": [
            "auth",
            "stagingOnly"
        ],
        "env_vars": {
            "DEBUG": "true",
            "SUCCESS_PASS": "password1",
            "SUCCESS_USER": "testuser@mobitru.com"
        },
        "report": "html"
    },
    "summary": "Test run completed",
    "artifacts": {
        "log": "e16368f3-b1cc-4a89-b616-852e71135669",
        "report": "54067875-4273-4735-860f-1ee66d4baaa8"
    },
    "created_at": "yyyy-mm-ddT19:16:41.598897Z",
    "updated_at": "yyyy-mm-ddT19:16:41.598897Z"
}
Step 7: Download execution report
You can also download a detailed report of the executed tests, which will be retained for up to 10 days after execution.
The report format is determined in the start tests API request by using one of two options in the report field:
- html – a visually accessible, single-page summary for quick human review of test statuses (Passed, Failed, Skipped)
- junit – a structured XML document for seamless integration with CI/CD pipelines and third-party test management tools
Here is an example of cURL request to download html log:
curl --output report.html --location 'https://app.mobitru.com/billing/unit/<BILLING_UNIT>/automation/api/v1/spaces/artifacts/<REPORT_ARTIFACT_ID>/download' \
--header 'Authorization: Bearer <ACCESS_KEY>'
Below you can find an example of the downloaded HTML page: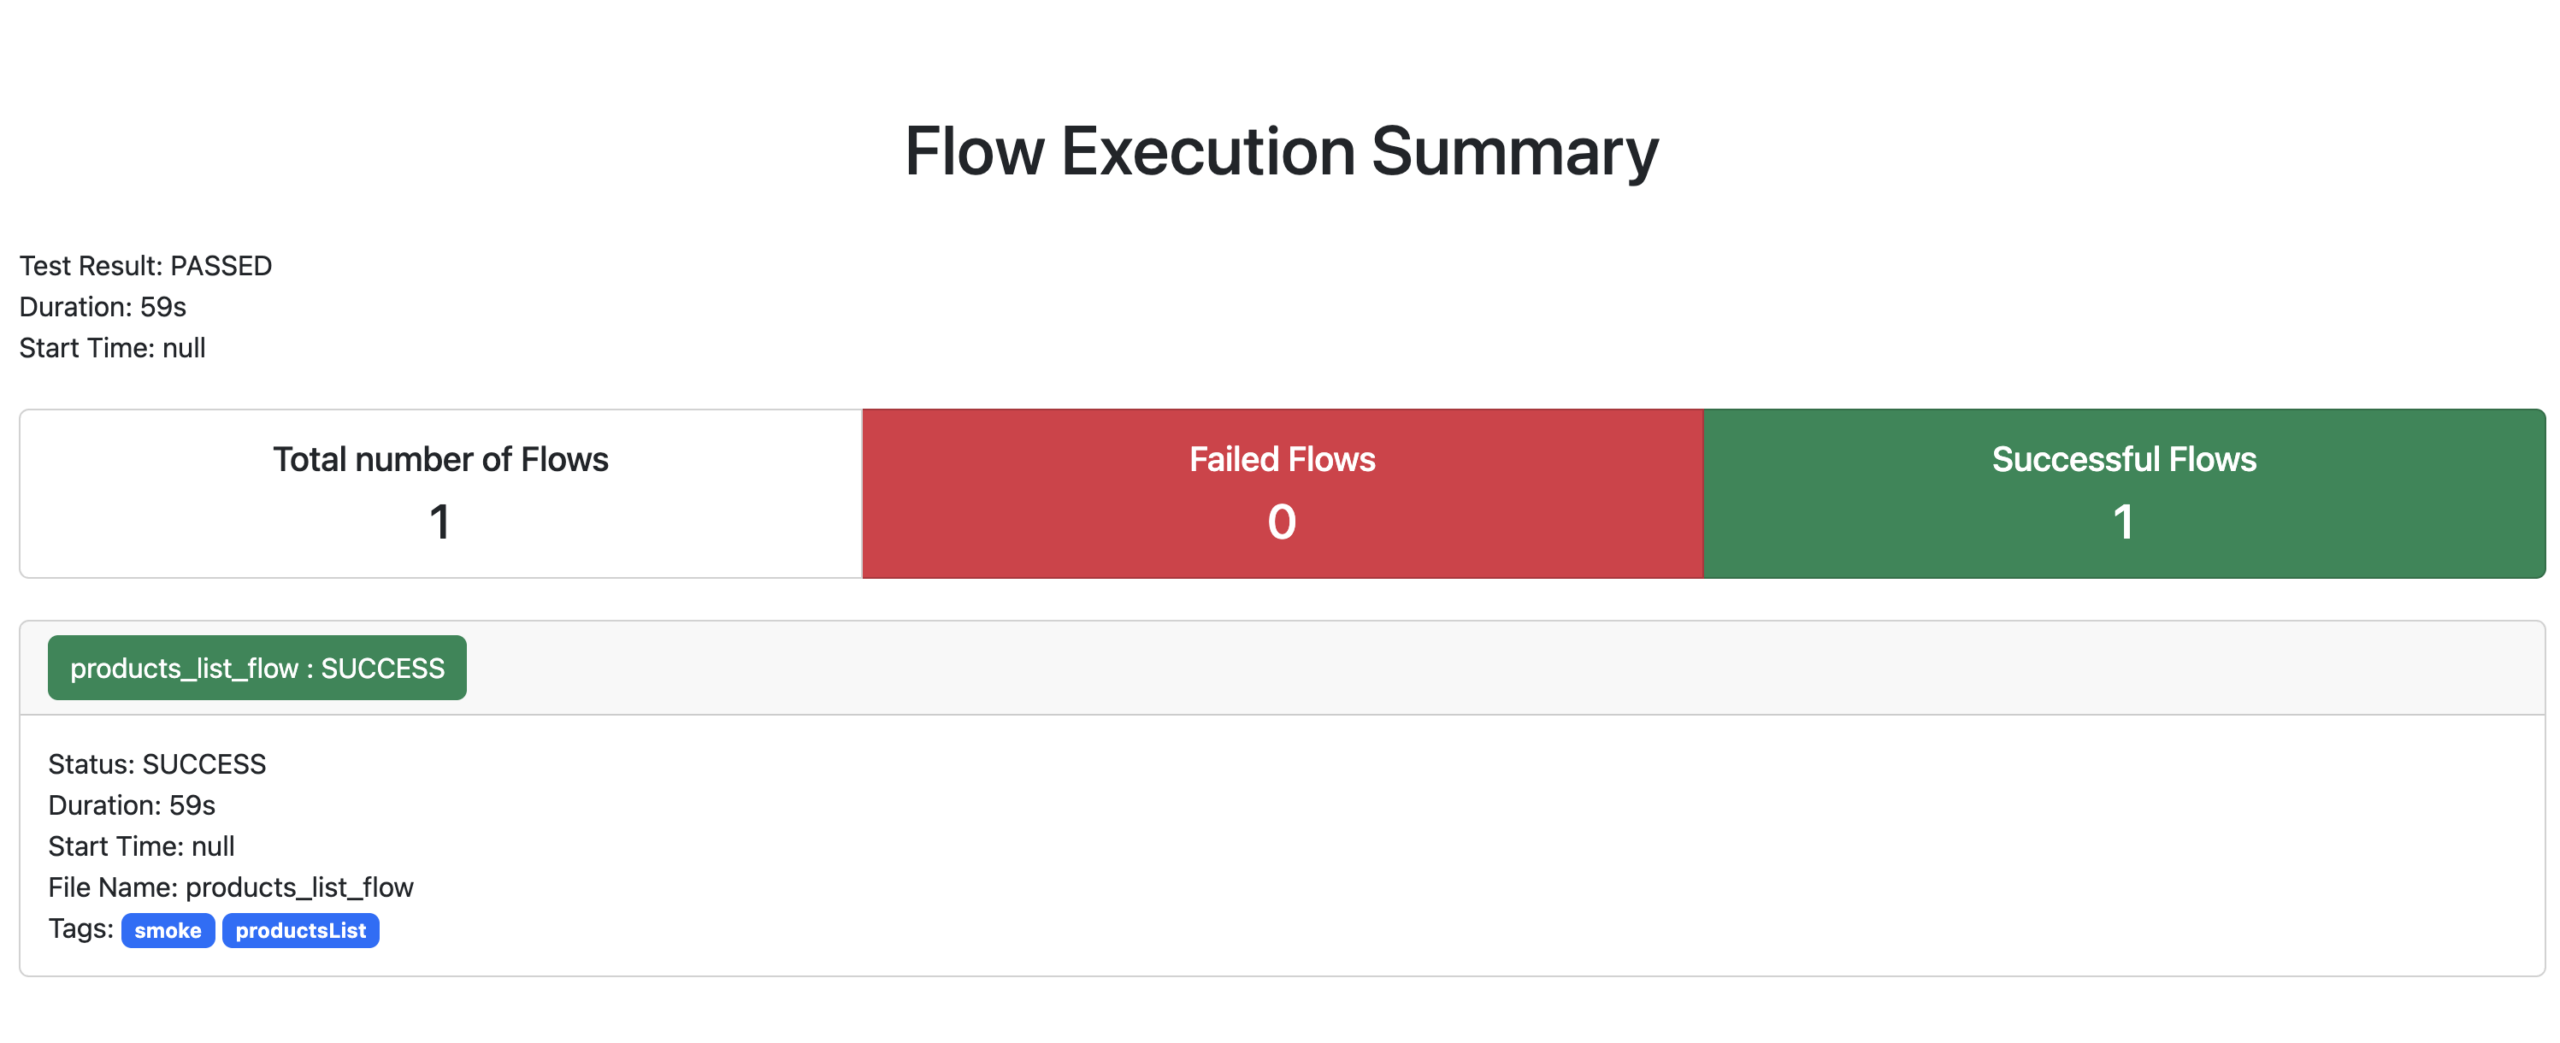
Here is an example of cURL request to download junit log:
curl --output junit_report.xml --location 'https://app.mobitru.com/billing/unit/<BILLING_UNIT>/automation/api/v1/spaces/artifacts/<REPORT_ARTIFACT_ID>/download' \
--header 'Authorization: Bearer <ACCESS_KEY>'
Below you can find an example of the downloaded XML:
<?xml version='1.0' encoding='UTF-8'?>
<testsuites>
  <testsuite name="Test Suite" device="24131FDEE006R6" tests="1" failures="0" time="60.0">
    <testcase id="products_list_flow" name="products_list_flow" classname="products_list_flow" file="products_list_flow.yaml" time="60.0" status="SUCCESS">
      <properties>
        <property name="tags" value="smoke, productsList"/>
      </properties>
    </testcase>
  </testsuite>
</testsuites>